
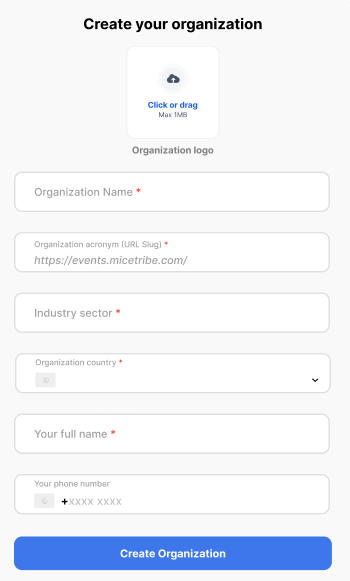
- After registering, you will be taken to the Create your organization screen automatically.
- Organization logo — click the upload box or drag and drop your logo file.
Note: The logo must be under 1MB. Accepted formats are typically PNG or JPG. This is optional but recommended — your logo will appear on your event pages and emails sent to attendees.
- Organization Name (required) — enter your full organization name as you want it to appear publicly.
- Organization acronym (URL Slug) (required) — enter a short identifier for your organization. This will appear in all your event links as:
https://events.micetribe.com/[your-slug]Tips for choosing your slug:
- Keep it short and lowercase (e.g.
micetribe,geg,tdxevents) - Use only letters, numbers, and hyphens — no spaces or special characters
- Choose carefully — this appears in every event link you share publicly and may be difficult to change later
- Keep it short and lowercase (e.g.
- Industry sector (required) — select the sector that best describes your organization from the dropdown.
- Organization country (required) — select your country from the dropdown using the flag selector.
- Your full name (required) — enter your first and last name as the organization owner.
- Your phone number — select your country code from the selector on the left, then enter your phone number.
- Click Create Organization.
- Your organization is now created and you will be taken to your MICEtribe dashboard, where you can start building your first event.